
Managing microclimates within a high end residential landscape requires a sophisticated understanding of water movement and soil hydrology. In many outdoor environments, specific zones often succumb to desiccation due to elevation changes, sun exposure, or soil composition variations. These dry spots compromise the visual unity of a professional design and can lead to the failure of expensive botanical specimens. Traditional clay pot irrigation, an ancient technique utilizing porous unglazed vessels, offers a sustainable and aesthetically seamless solution for targeted moisture delivery. By burying these vessels, known as ollas, directly into the root zone, a landscape architect can ensure consistent hydration without the surface evaporation associated with traditional spray heads. This method enhances curb appeal by eliminating unsightly surface hoses and reduces the overall water footprint of the property. For clients seeking a balance between ecological responsibility and lush, vibrant garden beds, integrating this subterranean system is a strategic move that addresses both functional irrigation needs and long term plant health.
Landscape Design Principles
In professional landscape architecture, every element must contribute to the overall structural integrity and visual flow of the environment. Integrating clay pot irrigation allows for greater flexibility in maintaining symmetry and visual balance across varied topographies. When a designer places high water demand plants in a prominent focal point, such as a central island or a flanking entrance bed, the subsurface moisture provided by the pots prevents the localized wilting that often ruins the clean lines of a formal garden. These pots work on the principle of soil moisture tension; as the surrounding soil dries out, water is pulled through the porous walls of the clay. This creates a self regulating system that keeps the foliage uniform in height and color.
Effective landscape planning also involves managing elevation layers and walkways. When installing subsurface irrigation, one must consider the grading of the site to ensure that subterranean water does not pool in unwanted areas. Because ollas are buried, they do not interfere with the installation of flagstone walkways or retaining walls. Designers can place these vessels strategically along the perimeter of hardscaped areas where heat reflectivity often creates parched soil conditions. This targeted approach allows for the inclusion of delicate species that might otherwise struggle in the radiant heat of stone patios. By layering the heights of the plantings around these hidden water sources, a designer creates a lush, tiered effect that hides the functional components of the garden while highlighting its botanical diversity.
Plant and Material Selection
The success of a clay pot irrigation system depends heavily on selecting the right materials and matching them with compatible plant species. The pots must be made of terracotta or other unglazed clays that have a high porosity. To maximize the efficiency of this system, use the following guide for selecting plants that thrive in conjunction with localized, consistent moisture.
| Plant Type | Sun Exposure | Soil Needs | Water Demand | Growth Speed | Maintenance Level |
| :— | :— | :— | :— | :— | :— |
| English Lavender | Full Sun | Sandy, well-drained | Low | Moderate | Low |
| Gardenia | Partial Shade | Acidic, organic | High | Slow | High |
| Black-Eyed Susan | Full Sun | Loamy, average | Moderate | Fast | Low |
| Daylily | Full Sun/Part Shade | Adaptable | Moderate | Fast | Low |
| Japanese Maple | Partial Shade | Well-drained, rich | High | Slow | Moderate |
| Rosemary | Full Sun | Poor, rocky | Low | Moderate | Low |
| Hydrangea | Partial Shade | Moist, loamy | Very High | Moderate | Moderate |
Implementation Strategy
Implementing a professional grade olla system begins with a comprehensive site analysis. Start by identifying the dry spots where soil moisture levels are consistently inadequate. Once identified, the layout should be marked using landscaping flags to ensure the spacing aligns with the final plant density. Generally, a 2 gallon clay pot can provide a moisture radius of approximately 24 to 36 inches. For larger garden beds, a grid pattern is often the most efficient way to ensure total coverage.
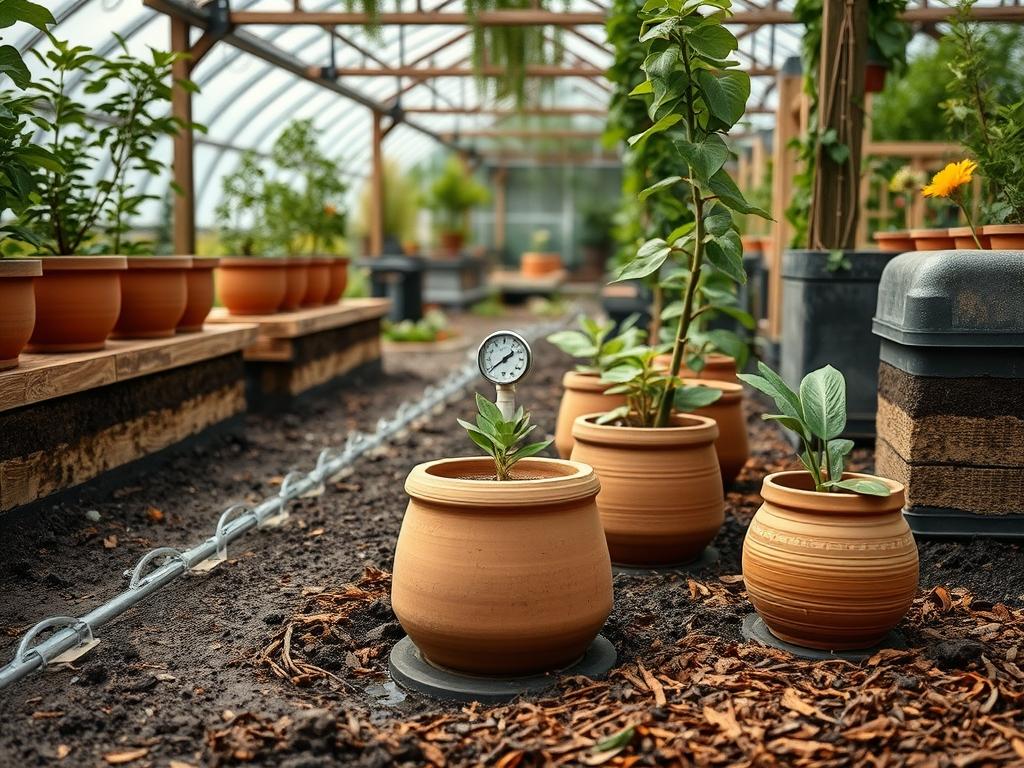
The installation process begins with excavation. Dig a hole that is slightly wider and deeper than the vessel itself. Mix the excavated soil with organic compost or peat moss to improve the soil’s ability to hold the moisture that will emanate from the pot. Place the olla in the hole so that the neck sits approximately 1 to 2 inches above the final soil line. This elevation prevents surface runoff from carrying silt or debris into the vessel, which would eventually clog the pores. Once the pot is positioned, backfill the hole with the amended soil and pack it firmly but gently to ensure good “pot to soil” contact. This contact is critical for the capillary action that makes the system work.
After the irrigation vessels are in place, the planting phase begins. Position your specimens within the moisture radius of the buried pots. For new installations, place the root balls of perennials and shrubs about 6 to 10 inches away from the clay wall. Finish the area with a thick layer of hardwood mulch or pine needles at a depth of at least 3 inches. This mulch layer is vital as it protects the soil surface from the sun, further reducing evaporation and keeping the underground reservoir cooler. Finally, fill the pots with water and secure the lids to prevent mosquito breeding and debris accumulation.
Common Landscaping Failures
One of the most frequent errors in clay pot irrigation is the failure to account for soil compaction. In high traffic areas, the pressure on the soil can compress the pore spaces, making it difficult for the moisture from the olla to migrate outward. This leads to a waterlogged pot and parched plants. To avoid this, designers should use stepping stones or defined paths to direct foot traffic away from the irrigation zones.
Another common failure involves improper root architecture management. If a pot is placed too close to a fast growing tree or an invasive shrub, the aggressive root systems may eventually encircle and crush the clay vessel or grow into the pores to find the water source. This can break the pot or render it useless over time. Similarly, neglecting the grading of a site can lead to drainage issues. If the pots are placed in a low spot where surface water naturally accumulates, the soil will stay oversaturated, leading to root rot for the surrounding plants despite the efficiency of the clay pot system. Finally, using glazed pots instead of unglazed terracotta is a terminal mistake; glazed pots are decorative and will not allow any water to seep into the surrounding environment.
Seasonal Maintenance
Maintaining a professional landscape requires a proactive approach to the changing seasons. In the Spring, inspect each olla for cracks that may have developed during the colder months. This is also the time to scrub the interior of the pots with a diluted vinegar solution to remove mineral deposits and salt buildup that can clog the clay pores.
During the Summer, focus on monitoring the water levels. In peak heat, a 1 gallon olla may need to be refilled every 3 to 5 days. Ensure that the mulch depth is maintained to provide maximum thermal protection. In the Autumn, as plants enter dormancy, the frequency of refilling will decrease. This is a good time to adjust the elevation of any pots that may have shifted due to soil heave or settling.
Winter management is perhaps the most critical for the longevity of the system. In climates where the ground freezes, the expansion of water inside the clay can cause the pots to shatter. It is recommended to either empty the pots completely and cover the openings or, in severe climates, dig them up and store them until the following spring. If the pots are left in the ground, they should be covered with a thick insulating layer of straw or burlap to mitigate the effects of freeze thaw cycles.
Professional Landscaping FAQ
How often do I need to refill the clay pots?
Under standard conditions, you should refill the vessels every 3 to 5 days. During extreme summer heat or in highly sandy soils, check the levels every 48 hours to maintain consistent moisture for the surrounding root zones.
Can I use liquid fertilizers inside the ollas?
Avoid putting high salt fertilizers directly into the pots. Over time, the minerals and salts can accumulate within the porous clay walls, eventually clogging them and preventing water from seeping out into the garden bed effectively.
What is the best way to clean a clogged olla?
Remove the pot from the ground and soak it in a 50/50 mixture of water and white vinegar. Use a stiff brush to scrub the exterior walls. This dissolves calcium and mineral deposits that block hydraulic conductivity.
Will this system work in heavy clay soil?
While it functions, the rate of water movement is much slower in heavy clay due to small pore sizes. Amend the surrounding area with coarse sand or expanded shale to improve the lateral movement of water from the pot.
Are these pots suitable for large trees?
Ollas are best suited for perennials, shrubs, and vegetables. Large trees have extensive root systems that require deeper and more widespread irrigation than a single clay pot can typically provide without using a massive, impractical array of vessels.